4. Project Automation Using Ant
| Author: | Nick Efford |
|---|---|
| Contact: | N.D.Efford@leeds.ac.uk |
| Status: | Final |
| Revised: | 2017-09-13 |
The objectives of this worksheet are for you to learn the main features of the Ant build tool, for you to gain experience of running Ant from the command line and for you to see how Ant is used within Intellij IDEA. You may find it useful to consult the Ant manual as you carry out the tasks below.
4.1. Getting Started
Create a directory in your filestore for this worksheet, then download Zip archive
Ant.zipinto that directory.Unpack the Zip archive - e.g., using the
unzipcommand in a terminal window. This will give you a directory tree like the followingbuild.xml lib/ hamcrest-core-1.3.jar junit-4.12.jar scripts/ alarmclock.bat alarmclock.sh clock.bat clock.sh src/ comp2931/ time/ AlarmClock.java Clock.java Time.java TimeTest.javaSpend a couple of minutes examining these files.
4.2. Ant Concepts
The file build.xml is an Ant buildfile. Open it in an ordinary
text editor such as Atom or gedit. You should see this:
1 2 3 4 5 6 7 8 9 10 11 12 13 14 15 16 17 18 19 20 21 22 23 24 25 26 27 28 29 30 | <?xml version="1.0"?>
<project name="Clocks" basedir=".">
<property name="src.dir" value="src"/>
<property name="lib.dir" value="lib"/>
<property name="scripts.dir" value="scripts"/>
<property name="build.dir" value="bin"/>
<path id="project.classpath">
<pathelement location="${build.dir}"/>
<pathelement location="${lib.dir}/junit-4.12.jar"/>
<pathelement location="${lib.dir}/hamcrest-core-1.3.jar"/>
</path>
<target name="init">
<mkdir dir="${build.dir}"/>
</target>
<target name="compile" depends="init" description="Compile source code">
<javac srcdir="${src.dir}" destdir="${build.dir}"
includeantruntime="false">
<classpath refid="project.classpath"/>
</javac>
</target>
<target name="clean" description="Remove compiled code">
<delete dir="${build.dir}"/>
</target>
</project>
|
Everything is defined inside a
projectelement, which has attributes to specify the project name and the base directory from which all paths to files and directories are computed.Inside the
projectelement are four property settings (lines 4-7). Rather like variables in a program, these provide a single point of definition for frequently-used values, making it easier to change those values in future.In this case, the buildfile defines properties specifying the three existing directories plus one that doesn’t yet exist. The latter is where the
.classfiles produced by the compiler will be stored.After the properties is a path definition (lines 9-13). This defines the project’s classpath - i.e., the path that will be used to find classes when invoking the Java compiler or JVM.
After the path definition are three targets, with names
init,compileandclean. Targets are sets of tasks to be peformed by Ant. You specify one or more targets to be executed when you run Ant.The
compiletarget contains thejavactask, which runs the Java compiler on the code in the directory subtree specified by propertysrc.dir. Notice thatcompiledepends oninit. This means thatinitwill run if necessary beforecompileruns. In this case,initsimply runs themkdirtask to create the subdirectory for compiled code.
4.3. Basic Usage
In a terminal window, cd to the directory containing the buildfile and enter the command
ant -h. This will show you the various options that can be specified when running Ant.Enter
ant -p. This provides ‘project help’ by listing the targets defined in the buildfile.Run the
compiletarget by enteringant compile. Ant will report on the tasks it is executing. (You can suppress this using the-qoption.) Notice thatinitruns first.Use
lsto list directory contents. Notice that abindirectory now exists. Look into the subdirectories ofbinand you will find the.classfiles generated by the compiler.Enter
ant compilea second time. Ant will do nothing because thebindirectory already exists and the bytecode it contains is up-to-date.Edit one of the
.javafiles undersrcand make a trivial change to one of the files (such as altering one of the comments). Save your change, then go back to the command prompt and enterant compileagain. Notice that only the changed file is recompiled.Enter
ant cleanto remove thebindirectory.Try entering
antwith no arguments. Ant will run and report ‘BUILD SUCCESSFUL’, but it won’t actually do anything because we haven’t specified a default target. Specify one now by going to your text editor and addingdefault="compile"to theprojecttag at the start of the buildfile.Enter
antagain with no arguments. Theinitandcompiletasks will be executed.
4.4. Running Applications
We have two Java applications: Clock and AlarmClock. The former
simulates a clock by printing the current time once every second. The latter
also displays the time but uses a Swing-based graphical user interface and
adds the ability to set an alarm to a time specified via a command line
argument.
Let’s add targets to run these applications.
Edit
build.xmland, beneath thecompiletarget, add the following chunk of XML:<target name="clock" depends="compile" description="Run Clock"> <java classname="comp2931.time.Clock"> <classpath refid="project.classpath"/> </java> </target>
Notice the dependency on
compileand the way in which the classpath is specified for thejavatask.Try running the
Clockapplication by enteringant clock. The application will run for 10 seconds and then stop. You can terminate it prematurely by pressingCtrl+C.Now add the following target to
build.xml:<target name="alarmclock" depends="compile" description="Run AlarmClock"> <java classname="comp2931.time.AlarmClock" fork="true" jvm="java"> <classpath refid="project.classpath"/> <arg value="+10"/> </java> </target>
Notice the use of
fork="true"in thejavatask. This means that the application will run in a separate JVM rather than in the JVM that is running Ant. This ensures correct behaviour for Swing-based applications.The
AlarmClockapplication requires a command line argument to specify alarm time, which we supply by nesting anargelement inside thejavaelement. The value of+10means an offset of 10 seconds in the future.Try running
AlarmClockby enteringant alarmclock. After 10 seconds, the window should flash with a yellow background. You can disable the alarm by clicking on the background. The application can be shut down in the usual way.
4.5. Running Tests
Ant provides the junit task, which can run unit tests using JUnit and
collect the results.
Add the following new target to
build.xml, beneath thealarmclocktarget:<target name="test" depends="compile" description="Run unit tests"> <junit fork="true"> <classpath refid="project.classpath"/> <formatter type="plain" usefile="false"/> <test name="comp2931.time.TimeTest"/> </junit> </target>
The
formatterelement inside the task configures how test output will be collected. In this case, it will be displayed as plain text on screen rather than being directed to a file. Thetestelement is used to specify the test classes you wish to run [1].Run the target with
ant test. Ant should run thejunittarget and report that 11 tests have passed, as well as listing the individual test cases and how long it took to execute them. (The latter can be avoided by specifying a formatter type ofbriefrather thanplain.)
4.6. Generating Documentation
Ant can run the Javadoc tool, which extracts information from comments in Java source code and generates HTML documentation for that code.
Add the following to
build.xml, beneath the existing property definitions:<property name="doc.dir" value="doc"/>
Now add a new target called
docsthat executes thejavadoctask:<target name="docs" depends="compile" description="Generate documentation from Javadoc comments"> <mkdir dir="${doc.dir}"/> <javadoc destdir="${doc.dir}" author="true" version="true"> <classpath refid="project.classpath"/> <package name="comp2931.time"/> <fileset dir="${src.dir}"> <exclude name="**/*Test.java"/> </fileset> </javadoc> </target>
This target creates a new directory if necessary and then runs Javadoc, putting the generated HTML files in that directory. The
filesetelement specifies the files to be processed as everything under thesrcdirectory with a name that does not end inTest.java. This ensures that documentation isn’t generated for any unit testing classes.Run the new target by entering
ant docs. This should create a new directory calleddocand then populate that directory with HTML pages generated for theTime,ClockandAlarmClockclasses. View this documentation by loadingdoc/index.htmlinto a web browser.
4.7. Adding Targets For Packaging
It is often convenient to bundle the .class files for an application
into a JAR file (Java Archive file). This makes distributing
applications in executable form easier. We might also want to distribute
code with accompanying documentation, bundling both together in a Zip
archive. Ant supports both of these tasks.
Add the following to
build.xml, beneath the existing property definitions:<property name="dist.dir" value="dist"/> <property name="name" value="clocks"/> <property name="version" value="1_0"/> <property name="release" value="${name}-${version}"/> <property name="jar.name" value="${name}.jar"/> <property name="jar.path" value="${dist.dir}/${jar.name}"/> <property name="zip.name" value="${release}.zip"/> <property name="zip.path" value="${dist.dir}/${zip.name}"/>
These define the names and locations of the JAR file that will hold the compiled applications and a Zip archive that could be used to ship this JAR file plus other associated files (shell scripts and documentation) to users.
Add the following target to support JAR file creation:
<target name="jar" depends="compile"
  description="Package AlarmClock as a JAR file">
  <mkdir dir="${dist.dir}"/>
  <jar destfile="${jar.path}">
    <fileset dir="${build.dir}" excludes="**/*Test.class"/>
    <manifest>
      <attribute name="Main-Class" value="comp2931.time.AlarmClock"/>
    </manifest>
  </jar>
</target>
The
jartarget has successful compilation as a prerequisite. It packages the.classfiles underbin, excludingTimeTest.class, as a single JAR file calledclocks.jarand puts this in thedistdirectory. This directory will be created if it doesn’t already exist.Try this out now. Run the target with
ant jar, then move into thedistdirectory and try running theAlarmClockapplication like so:java -jar clocks.jar +10
Add the following target to support Zip archive creation:
<target name="zip" depends="jar,docs"
  description="Create a Zip archive for distribution">
  <zip destfile="${zip.path}">
    <zipfileset dir="${scripts.dir}" includes="*.bat,*.sh"
      prefix="${release}"/>
    <zipfileset dir="${dist.dir}" includes="${jar.name}"
      prefix="${release}"/>
    <zipfileset dir="${doc.dir}" prefix="${release}/doc"/>
  </zip>
</target>
The
ziptarget expects a JAR file and Javadoc-generated documentation to be present and will execute the relevant targets if not. It packages these elements along with the scripts in thescriptsdirectory as a single Zip archive. Try running the target now withant zip. You should see a.zipfile created in thedistdirectory. Copy this file somewhere else, unzip it and try running the applications via the scripts.Finally, alter the existing clean-up target and add another one, so that you end up with the following code:
<target name="clean" description="Remove compiled code and docs">
  <delete dir="${build.dir}"/>
  <delete dir="${doc.dir}"/>
</target>

<target name="veryclean" depends="clean" description="Remove all generated files">
  <delete dir="${dist.dir}"/>
</target>
You now have two ways of cleaning up the project:
ant cleanwill remove compiled code and documentation, leaving files for distribution untouched, whereasant verycleanwill remove all files generated by the other targets. Try the latter now.Try running
ant zipagain to see how the distributable Zip archive can be built from scratch with a single command.
4.8. Using Ant With IntelliJ
IntelliJ provides some rudimentary support for Ant buildfiles. To try this out, open an existing Java project - e.g. the
JUnitproject created for Unit Testing With JUnit. Once the project is open, choose .On the resulting dialog, select the option to ‘Generate single-file ant build’ and specify
buildas the output file name. Then untick the checkbox for ‘Enable UI forms compilation’ and click OK. Two new files should be created in the project:build.xmlandbuild.properties.Open
build.xmlin the code editor. You will see that it is fairly complex. Fortunately, IntelliJ provides an easier way to interact with it.Click on the Ant Build tab, normally located on the right edge of the UI. The Ant Build tool window will slide out. Click on the green ‘plus’ button at the top of the tool window, select
build.xmlon the resulting dialog and click OK. The targets from the buildfile should now appear in the Ant Build window.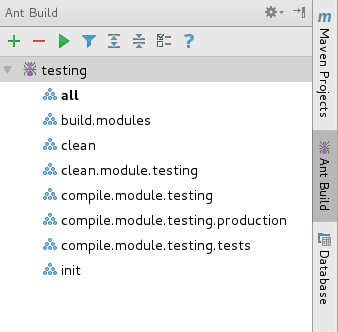
Right-click on the ‘clean’ target in the Ant Build window and choose . Activate the Messages tool window by clicking the 0: Messages tab or by pressing
Alt+0. You should see a series of messages on the progress of the build displayed. These are organised hierarchically; you can double-click on entries to go deeper and get more detail.Now turn your attention to the Project tool window. If you expand the
outdirectory, you should see that its sudirectories are now empty.Right-click on the ‘compile.module.testing’ target in the Ant Build window and choose . This compiles both the
Timeclass and theTimeTestclass. If you check theoutfolder again, you should see that the corresponding.classfiles have now been added.
Note
Support for Ant in IntelliJ is limited. Automatically generated buildfiles contain targets to compile and clean a project, but if you want anything else (e.g., a target to run unit tests) you will need to add it yourself.
Other build tools such as Gradle are better supported by IntelliJ.
| [1] | If there are multiple test classes, you either use multiple test
elements or use a batchtest element to tell Ant it should run
all the test classes that match a particular pattern.) |