8. Database Management & JDBC
| Author: | Nick Efford |
|---|---|
| Contact: | N.D.Efford@leeds.ac.uk |
| Status: | Draft |
| Revised: | 2017-09-14 |
This worksheet will introduce you to how databases are managed from within IntelliJ IDEA and how they are accessed from Java programs via the JDBC API.
The Apache Derby database - which comes bundled with the JDK, branded as ‘Java DB’ - is used throughout. However, please note that, aside from the details of driver names and connection URLs, very little in this worksheet is specific to any particular RDBMS. Examples given here of how to connect, do queries and extract results will work just the same with SQLite, MySQL, etc. (Indeed, this is whole point of JDBC…)
For more information, please consult the Java Tutorial’s Lessons on JDBC and the section of the IntelliJ online manual on Working with the Database Tool Window.
8.1. Getting Started
As first steps, you need to configure the database drivers in IntelliJ and set up a suitable database.
Start IntelliJ and create a new Java project called
JDBC. Click the Database tab to activate the Database tool window, then click on the Data Source Properties button, or pressAlt+Enter.On the Data Sources and Drivers dialog, select ‘Derby (Embedded)’ from the list of drivers on the left. Under ‘Driver files’ on the right of the dialog, untick the option to ‘Use Apache Derby [latest]’, then click the green ‘+’ button in the Additional Files section.
Browse to where the JDK has been installed (on SoC PCs, this will be
/usr/java/latest), move down into thedb/libsubdirectory and selectderby.jar. Click OK to dismiss the driver selection dialog, then OK again to dismiss the Data Sources and Drivers dialog.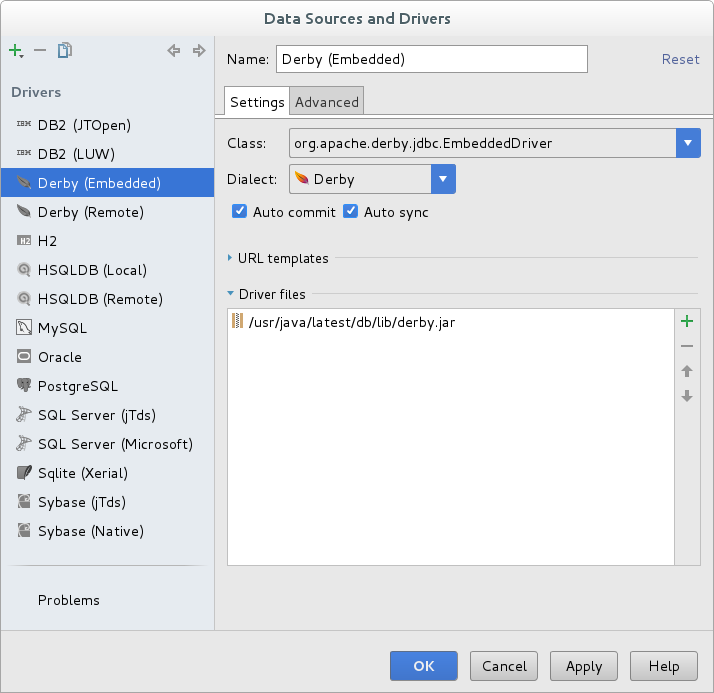
Now let’s create the database. Click on the green ‘+’ button in the top-left corner of the Database tool window or press
Alt+Insert, then choose . On the resulting dialog, specify the full path to a directory inside your JDBC project calledbooks. The Name field should autofill asbooks.Tick the ‘Create database’ checkbox next to the database path, then click OK.
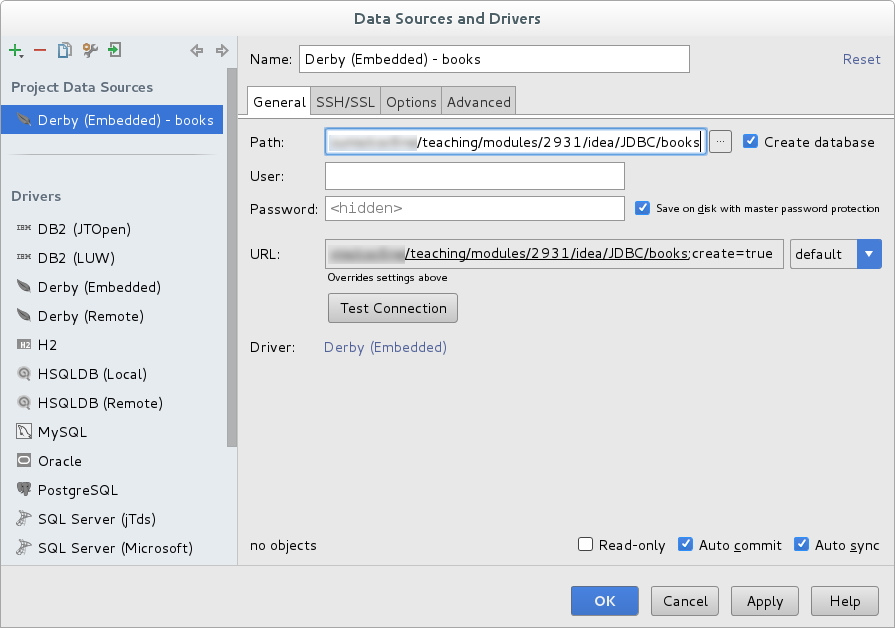
If all is well, a new directory called
booksshould appear in the Project tool window and a new Data Source called ‘books’ should appear in the Database tool window. You should also see a new code editor entitled ‘books’ appear in the centre of the UI, which you can ignore for now.Note
There’s no requirement to create the directory for an embedded database inside the project. We do it here simply because it is neater.
However, this does mean that if you are using version control in this project, you’ll need to add
books/to your.gitignorefile. You definitely don’t want to have your database under version control!Watch out for this when doing your project!
Finally, let’s populate the database. Download the file
setup.sqland copy it into the top-level directory of theJDBCproject, then open the file in the editor and examine it. (You may at this point see an ‘SQL dialect is not configured’ message at the top of the window; if so, click on the ‘Change dialect’ link and set the Project SQL Dialect to ‘Derby’ on the resulting dialog.)Running these SQL statements is easy; just right-click on the file and choose , or press
Ctrl+Shift+F10. Progress will be reported in the Run tool window.
8.2. Database Management
Expand the Data Source entry in the Database tool window. Under
APP, you should see tables calledBOOKandPUBLISHER. If you expand these entries, you will see details of the columns in these tables.Double-click on the
PUBLISHERtable. A new panel will open in the centre of the UI, showing the contents of the table. Do the same forBOOK.
Investigate database management options further by right-clicking on one of the tables listed in the Database tool window. Notice how there are options to drop the table or dump its data to a file in various formats.
Right-click on
APPand try the option. You should get a diagram like this: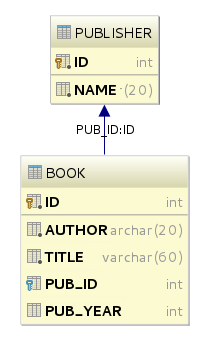
Tables can be edited from within IntelliJ. Try this now by clicking on the
PUBLISHERtab to view thePUBLISHERtable. Select the row for ‘Syngress’ and click the ‘-‘ button above the table to delete the row. Click on the Submit button (the one with ‘DB’ above green upward-pointing arrow) to confirm the deletion. The ‘8 rows’ appearing above the table will change to ‘7 rows’.Now click the ‘+’ button to add a new row. A row will appear at the bottom of the table, containing nulls in each column. If you see
<null>in theIDcolumn, double-click on it so that its value changes to<generated>, then double-click on the null in theNAMEcolumn, type a suitable publisher name and press the Enter key.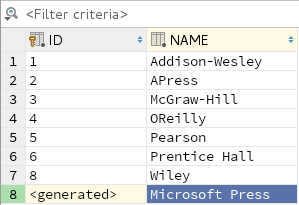
As before, use the Submit button to commit the change. You should see the ‘7 rows’ above the table change to ‘8 rows’.
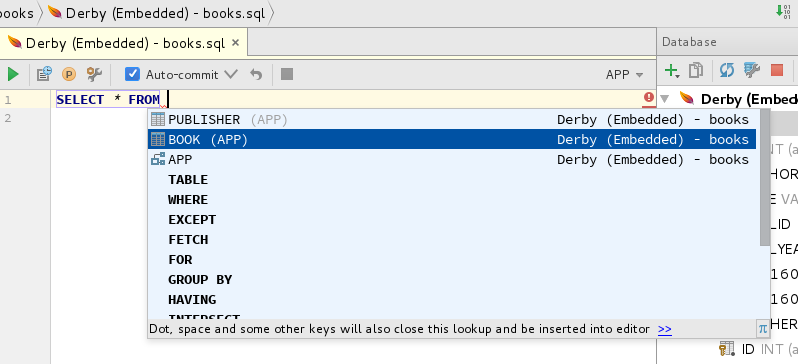
Finally, try executing a query. Click on the ‘books’ tab and begin typing an SQL query such as this:
SELECT * FROM BOOK WHERE PUB_YEAR > 2004
As you type this, IntelliJ will offer to autocomplete statement elements for you. Use the Tab key to do this, in the usual way.
When the query is complete, click the Execute button (the green triangle) in the top-left corner, or press
Ctrl+Enter. You do not need to terminate the statement with a semicolon.Query results will be displayed in tabular form in a new Database Console tool window, at the bottom of the UI.
8.3. Connecting With JDBC
Right-click on the
srcfolder of theJDBCproject and choose . Specify a package name ofcomp2931.jdbc.Download
DerbyUtils.javaandQuery.javaand copy them into thesrc/comp2931/jdbcdirectory.DerbyUtilscontains some utility methods that simplify shutdown and error handling for Apache Derby databases, andQueryis a partially complete program to perform a query using JDBC. Double-click on the latter to open it in a code editor.Start by trying to load a database driver explicitly. Remove the
TODO:from the first comment and add the following code beneath it:Class.forName(driver); System.out.println("Driver loaded.");
IntelliJ will underline the first of these statements and complain about an unhandled exception. To fix this, uncomment the first of the two
catchblocks. (To do this quickly, highlight the entire block, then pressCtrl+/.)Now add the code that connects to the database. Remove the
TODO:from the second comment and add the following code beneath it:Connection connection = DriverManager.getConnection(url); System.out.println("Connection established.");
As you type this, use
Alt+Enterwhen prompted to add the needed import statements. Make sure the imports are fromjava.sql, not from any other package!There will be another unhandled exception error at this point, which you can fix by uncommenting the second
catchblock. UseAlt+Enteragain to accept the import ofjava.sql.SQLException.Find the ‘Close connection’ comment. Remove the
TODO:from the comment and add the following code beneath it:connection.close(); System.out.println("Connection closed.");
In the Database tool window, disconnect from the database by clicking the Disconnect button (the red square). The run
Queryby clicking on the green triangle in the margin of the editor window and choosing .You should see “Failed to load JDBC driver!” displayed in the Run tool window.
Note
Although the Database tool window has been configured with the required database driver, these settings don’t carry over to your own code, so you still need to add the driver to the project classpath in order to run the program successfully!
To fix the problem, choose . On the resulting dialog, select ‘Libraries’ and click the ‘+’ button. Choose ‘Java’ from the list of options and then browse to where the
derby.jarfile is located (see earlier). Select the file and click OK, then click OK again to dismiss the Project Structure dialog.Rerun the program and this time you should see the following sequence of messages appearing in the Run tool window:
Using driver org.apache.derby.jdbc.EmbeddedDriver
Connection URL is jdbc:derby:books
Driver loaded.
Connection established.
Connection clos/home/csunix/csc6ne/teaching/modules/2931/wstest/JDBCed.
Shutdown completed successfully.
Note
If you see an error, it could be that the Database tool is still connected to the database. Click the Disconnect button (a red square) at the top of the Database tool window, then try running the program again.
8.4. Querying With JDBC
Remove
TODO:from the remaining ‘To Do’ comment and add the following code beneath it:String sql = "SELECT * FROM BOOK WHERE PUB_YEAR > 2004"; try (Statement statement = connection.createStatement()) { ResultSet results = statement.executeQuery(sql); }
As you type in this code, use
Alt+Enterto accept IntelliJ’s suggested imports for theStatementandResultSetclasses.This structure is known as a try-with-resources block. It ensures that the resources associated with the
StatementandResultSetobjects are released when no longer needed.The code above will perform the query, but does not extract the results. For that, you will need to add a loop like this to the try-with-resources block:
while (results.next()) {
  String author = results.getString(2);
  String title = results.getString(3);
  int year = results.getInt(5);
  System.out.printf("%s (%d) %s%n", author, year, title);
}
Think of the
ResultSetobject as having a cursor, initially pointing before the start of the query results. Calling thenextmethod advances the cursor to the next row of results, returningtrueif there are results available,falseotherwise. Methods such asgetStringandgetIntcan be used to extract strings, integers, etc, from the currently-referenced row.Notice the use of column indices as method arguments. If you check the
BOOKtable in the Database tool window, you will see that author is the second column, title is the third column and year of publication is the fifth column.Now run the program again. You should see the following in the Run tool window:
Using driver org.apache.derby.jdbc.EmbeddedDriver
Connection URL is jdbc:derby:books
Driver loaded.
Connection established.
Gollman D (2011) Computer Security (3rd ed.)
Liang YD (2014) Introduction to Java Programming (10th ed.)
Rubin KS (2013) Essential Scrum
Seacord R (2006) Secure Coding in C and C++
Shostack A (2014) Threat Modeling: Designing For Security
Connection closed.
Shutdown completed successfully.
8.5. Queries With Parameters
Supposed you wanted to query for books by author name and allow the user to specify a search term that matches the name. You might be tempted to construct a query string like this:
String sql = "SELECT * FROM BOOK WHERE AUTHOR LIKE '" + search + "'";
where search is a String variable containing the user’s input.
Warning
This is insecure and an extremely bad idea.
If the user can supply arbitrary content for search, it will be
possible for them to alter the SQL statement to suit their own purposes.
This is known as SQL injection. We will explore this and similiar
vulnerabilities in COMP3911 next year.
Instead of constructing the query by string concatenation, you should use prepared statements.
Modify the query code so that it looks like this. (The lines to be changed are highlighted.)
String sql = "SELECT * FROM BOOK WHERE AUTHOR LIKE ?";

try (PreparedStatement statement = connection.prepareStatement(sql)) {
  String search = JOptionPane.showInputDialog("Search term");
  statement.setString(1, search);
  ResultSet results = statement.executeQuery();
  while (results.next()) {
    String author = results.getString(2);
    String title = results.getString(3);
    int year = results.getInt(5);
    System.out.printf("%s (%d) %s%n", author, year, title);
  }
}
Here, the
?in the query string is a placeholder for user input. The value to be substituted for this placeholder is provided by callingsetStringon thePreparedStatementobject.Because the SQL statement has already been parsed, it is not possible for the content of
searchto change its meaning, thereby avoiding the threat of SQL injection.Try running the program again. Enter a search term such as
S%to find all the authors whose surnames begin with ‘S’.
8.6. Updating a Table With JDBC
Download
Update.javaand copy it into the directorysrc/comp2931/jdbcof the project. Then open it in the code editor. Take a look at the first line inside thetryblock:System.setProperty("jdbc.driver", driver);
This is a convenient alternative to the
Class.forNameapproach seen inQuery.java. One advantage is that it simplifies exception handling, because it won’t generate a ClassNotFoundException; another is that property settings can be loaded from a file, or even passed in as a command line option to the JVM.Remove the
TODO:from the ‘Insert data’ comment, then add code underneath to specify an SQL statement that will insert a new row into theBOOKtable:String sql = "INSERT INTO BOOK(AUTHOR, TITLE, PUB_ID, PUB_YEAR) VALUES (?,?,?,?)";
Underneath this, add a try-with-resources block that creates a
PreparedStatementobject calledstatement, using the SQL specified by thesqlvariable.Inside the try-with-resources block, add code that will substitute values into
statementand then execute the update on the database:statement.setString(1, "Reese G"); statement.setString(2, "Java Database Best Practices"); statement.setInt(3, 4); statement.setInt(4, 2003); int count = statement.executeUpdate(); System.out.printf("Rows inserted: %d%n", count);
Beneath this block, add similar code that will insert another row. This time, use values of “Sperko R” for author, “Java Persistence for Relational Databases” for title, 2 for the publisher ID and 2003 for publication year.
Now run the program. You should see output like this:
Connection established.
Rows inserted: 1
Rows inserted: 1
Connection closed.
Shutdown completed successfully.
Use the Database tool window to verify that the two new rows of data have indeed been inserted into
BOOK.Note
When connecting to a remote database server to perform repeated insertions of data, performance can improve significantly if you execute those insertions as a batch.
You can do this by repeatedly calling
addBatchon yourPreparedStatementobject, after setting the values for each new row. You then callexecuteBatchto execute all the accumulated insertions.
8.7. Connecting Over The Network
Derby can act both as an embedded database, as in the exercises above, or as a database server accessed over the network.
To access a Derby server from IntelliJ, you need to configure a new data source. Click on the Data Source Properties button in the Database tool window to bring up the Data Sources and Drivers dialog and select ‘Derby (Remote)’ from the list of drivers on the left.
Under ‘Driver files’ on the right of the dialog, untick the option to ‘Use Apache Derby [latest]’, then click the green ‘+’ button in the Additional Files section.
Browse to where the JDK has been installed (on SoC PCs, this will be
/usr/java/latest), move down into thedb/libsubdirectory and selectderbyclient.jar. (Note: this is different from the file used for the embedded database connection!)Click OK to dismiss the driver selection dialog, then OK again to dismiss the Data Sources and Drivers dialog.
Now click on the green ‘+’ button at the top of the Database tool window or press
Alt+Insert, then choose . On the resulting dialog, addbooksto the end of the URL. The complete URL should bejdbc:derby://localhost:1527/books
Then click OK. Don’t worry if you see a connection error at this point; this will be fixed by running the server.
Download
dbclasspath,dbstartanddbstopinto the top-level directory of your IntelliJ project. These shell scripts will simplify the business of running the database server.Click the Terminal tab to activate the Terminal tool window. In this window, set execute permissions on the scripts with
chmod u+x db*
Then enter the following commands to set up your classpath and run the server:
export DERBY_HOME=/usr/java/latest/db
./dbclasspath
./dbstart &
Note: this definition of
DERBY_HOMEshould be correct for SoC PCs but you will need to modify it when running on your own PC.Now click on the newly-created data source in the Database tool window. It will probably be named
books@localhostor similar. Then click the Synchronize button or pressCtrl+Alt+Y. This will establish a connection with the server. You should find that you are now able to view the contents of theBOOKandPUBLISHERtables, issue queries, etc - just as you did with the embedded database.Now try modifying the
Queryprogram so that it connects to the database over the network rather than via the filesystem.First, you’ll need to ensure that the network client driver is in the project classpath. Choose . On the resulting dialog, select ‘Libraries’, then select the ‘derby’ entry created previously. Click on the ‘+’ button above the panel on the right or press
Alt+Insertto add a new library file. Browse to where the Derby JAR files are located, selectderbyclient.jarand click OK. Then click OK again to dismiss the Project Structure dialog.Next, change the definitions of the
driverandurlvariables in theQueryclass to the following:String driver = "org.apache.derby.jdbc.ClientDriver"; String url = "jdbc:derby://localhost:1527/books";
If you run the
Queryprogram, you should find it functions just as it did before.Note
Changing the program from using an embedded database to a database server was a simple matter of changing the name of the driver and the connection URL (and making sure that the required driver classes were available to the program).
The same simple steps would be required if switching to a different RDBMS such as MySQL or PostgreSQL. This level of abstraction is a key benefit of using JDBC.
Shutdown the database server by running the following command in the Terminal tool window:
./dbstop
8.8. Where Next?
This worksheet has covered only the most basic uses of JDBC. For example, we have not covered transactions. There are also a number of more advanced features provided by the API. For example, you can use RowSet instead of ResultSet to process query results. You can also connect using a DataSource object, which can provide facilities such as connection pooling and more advanced transaction management. You may wish to explore some of these more advanced features when you do your group project.