2. Unit Testing With JUnit
| Author: | Nick Efford |
|---|---|
| Contact: | N.D.Efford@leeds.ac.uk |
| Status: | Final |
| Revised: | 2017-09-15 |
The aim of this worksheet is to help you learn how the JUnit framework can be used for unit testing of code, specifically from within Intellij IDEA. If you have further questions about JUnit after doing this work, you may find that the JUnit FAQ answers them.
Note
We’ve flagged this worksheet as ‘essential’, but learning how to write JUnit tests is the important thing. Learning how IntelliJ supports unit testing is much less important.
If you’re not a fan of IntelliJ, feel free to ignore those aspects of the worksheet and focus instead on the use of JUnit itself. The main thing is to make sure that you can write and run JUnit tests successfully, irrespective of the environment you use for that.
2.1. Getting Started
Start IntelliJ and create a new Java project called
JUnit. DownloadTime.javaand copy it into thesrcdirectory of the project. When theTimeclass appears in the Project tool window, double-click on it to open it in the editor.Examine the code and you will see that the package declaration at the top of the file is underlined with a red wavy line, signifying an error. Notice also the thin red marker appearing at the right margin. This is a link that you can hover over to see details of the error or click on to quickly navigate to the line from elsewhere in the file.
The problem here is that Java expects classes to be organised in a directory tree that matches their package declarations. In this case, it means that the
Timeclass should be in the directorysrc/comp2931/timeunderneath the project.Fortunately, IntelliJ can help here. If you click on the package name, you should see a red ‘light bulb’ icon appear, signifying that a fix is available. Click on this and choose the first option, ‘Move to package comp2931.time’. This will resolve the problem.

Some further set-up is necessary before you can begin testing the
Timeclass using JUnit. Right-click on theJUnitproject directory in the Project tool window and choose . Entertestsas the directory name and click OK.Then right-click on
testsand choose . This tells IntelliJ where tests should be located in the project.Note
Although you can put your tests into the same directory as the code they are testing if you want, it is cleaner to keep the two separated.
2.2. Creating a Test Class
In order to test the behaviour of the Time class using JUnit, you need to
create a separate class that contains all of the tests.
Click on the first line of
Time.java. When the yellow ‘light bulb’ icon appears, click on it and choose the ‘Create Test’ option.In the resulting dialog, choose ‘JUnit4’ as the testing library. IntelliJ will report that the library is not found.
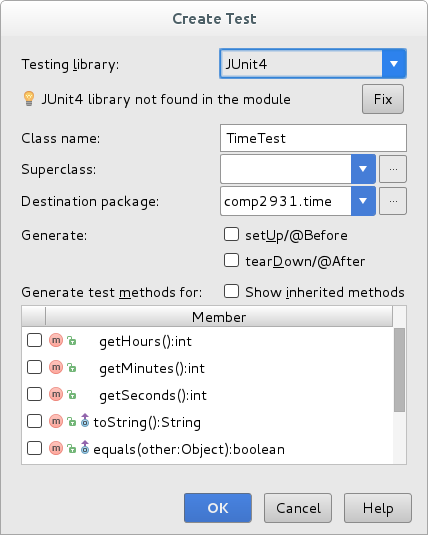
Click the Fix button and choose the ‘Copy JUnit4 library files’ option, then click OK. Make sure sure that the test class name is set to
TimeTestand that the destination package iscomp2931.time. Then click OK to create the test class.IntelliJ will create a new class
TimeTestand open the fileTimeTest.javafor you in the editor. Change the default doc comment at the start of the class definition to something more appropriate, such as ‘Unit tests for the Time class’.Examine the layout of the project in the Project tool window. Notice how the
TimeTestclass has been given a package declaration that matches the one given toTime. Notice also that the class has been put under thetestsdirectory rather than undersrc. Finally, notice that a new directory calledlibhas been created, containing two JAR files. These are the libraries of code needed to support testing using JUnit.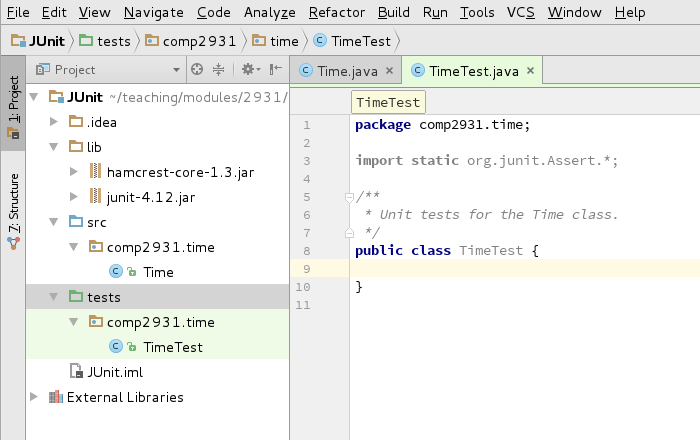
2.3. Writing & Running Tests
Add the following import statement to
TimeTest.java:import static org.hamcrest.CoreMatchers.*;
You will need this to write assertions for the tests using the more readable ‘Hamcrest’ syntax.
Now put the cursor inside the definition of
TimeTestand either right-click and choose or pressAlt+Insert. From the resulting pop-up menu, choose . Modify the generated test so that it looks like this:@Test public void hours() { Time midnight = new Time(0, 0, 0); Time noon = new Time(12, 0, 0); Time elevenPm = new Time(23, 0, 0); assertThat(midnight.getHours(), is(0)); assertThat(noon.getHours(), is(12)); assertThat(elevenPm.getHours(), is(23)); }
To run this test, a suitable run configuration is needed. You could create this manually, but there is an easier way. Click on the green icon that appears in the left margin at the start of the class definition and choose the option to ‘Run TimeTest’.
A run configuration will be created and the tests in
TimeTestwill execute. Results will appear in the Run window at the bottom of the UI.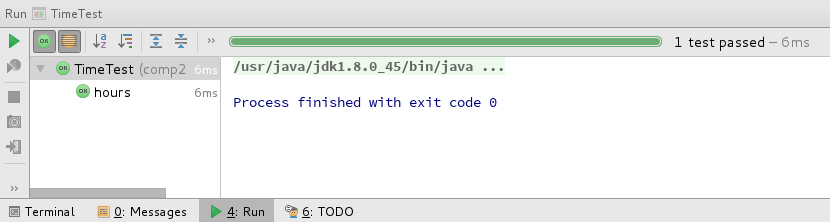
Notice how the Run window works differently when running JUnit tests. The tests are listed in a panel on the left and details of failing tests appear in the wider panel on the right. In this case, there are no failures - indicated by the green bar at the top of the Run window.
Note
Depending on the versions of Java and IntelliJ that you are using, and where you are running them, you might see a warning about ‘JavaLaunchHelper’ displayed in the Run window. You can safely ignore this. (It’s a bug that will be fixed in a forthcoming release of the JDK.)
2.4. Testing For Exceptions
So far, you have tested only that the hours component of a
Timeobject is initialised correctly when a legal value is supplied to the constructor. What if an illegal value is supplied instead? The Javadoc comments forTimeindicate that such values should trigger anIllegalArgumentException, so you need to verify that this is what actually happens.Add the following to
TimeTest:@Test(expected=IllegalArgumentException.class) public void hoursTooLow() { new Time(-1, 0, 0); }
Then add a comparable test case for an hours value that is too high. Do this in a new method, not in
hoursTooLow. You should now have three tests inTimeTest.Run the tests again and you should see a red bar, because one of the three tests will have failed. (If you don’t see this, try using a different hours value. Remember the importance of testing at the boundaries where behaviour is supposed to change.)
Check the Run window to find out which test failed. Use this information to find the problem in
Time.java. Fix the problem, then check that you have succeeded by rerunning the tests; if the bar is green again, you’ve done it!
2.5. Alternative Assertions
Study the
equalsmethod in theTimeclass. This should return:truewhen aTimeobject is compared with itself;truewhen it is compared with a differentTimeobject having the same internal state;falsewhen it is compared with a differentTimeobject having a different internal state;falsewhen it is compared with some other type of object (regardless of whether that other object resembles theTimeobject in some way).Now write the following test for
equalsinTimeTest:@Test public void equality() { Time noon = new Time(12, 0, 0); assertTrue(noon.equals(noon)); assertTrue(noon.equals(new Time(12, 0, 0))); assertFalse(noon.equals(new Time(13, 0, 0))); assertFalse(noon.equals(new Time(12, 1, 0))); assertFalse(noon.equals(new Time(12, 0, 1))); assertFalse(noon.equals("12:00:00")); }
Can you see the correspondence between this code and the requirements for the behaviour of the
equalsmethod stated above? [1]Notice that different types of assertion are being used here:
assertTrueandassertFalse, rather thanassertThat. In cases where the method under test returns abooleanvalue, this form is a little simpler. You could still useassertThatif you wished:assertThat(noon.equals(noon), is(true)); assertThat(noon.equals("12:00:00"), is(false));
You could even use this:
assertThat(noon, equalTo(noon));
assertThat(noon, not(equalTo("12:00:00")));
equalToandnotare examples of Hamcrest matchers, just like theisused in earlier assertions. The reason thatequalToworks here is that under the hood it uses an object’sequalsmethod to test for equality. (However, the earlier examples are probably better, because they call the method being tested explicitly.)Rerun the tests to check that you still have a green bar.
There are other kinds of assertion and a whole range of different matchers that can be used with
assertThat. Have a look at the JUnit assertion examples and the Hamcrest Tutorial for more information.
2.6. Test Fixtures
Did you notice some duplication in the test cases implemented so far?
Both hours and equality create a Time object to represent noon.
If you find the same object being used multiple times, then you can save
yourself some typing and simplify your tests by making that object part of a
test fixture: a fixed context that is generated automatically for you
at the start of each test.
Define
noonas a private field at the start of theTimeTestclass:private Time noon;
Then remove the lines defining local variable
noonfrom thehoursandequalitymethods.Now add the following to
TimeTest, after the field definition and before any of the test cases:@Before public void setUp() { noon = new Time(12, 0, 0); }
The
@Beforeannotation tells JUnit that thesetUpmethod creates a test fixture. Thenoonfield will be guaranteed to have this value before each test executes.Run the tests again. There should be no change in the output from JUnit.
2.7. More Testing
Add tests for the
inSecondsandplusmethods ofTime. Make assertions usingassertThatwhere possible and remember to check thatplusgenerates anIllegalArgumentExceptionwhen expected to do so.Run your tests and, if they fail, fix the corresponding problems in the
Timeclass.Add a test called
timeToStringthat tests thetoStringmethod of theTimeclass. Then add a test calledstringToTimeto test creation ofTimeobjects from strings such as"12:30:06"and"17:45".Run your tests and, if they fail, fix the corresponding problems in the
Timeclass.If you find that you have reused the same
Timeobjects across multiple tests, refactorTimeTestso that these objects are created in your test fixture. Make sure that your tests still behave correctly afterwards!
| [1] | This example tests all aspects of equals behaviour via a single
test method. An alternative (and perhaps better) approach would
be to have four smaller tests, one for each aspect of the behaviour. |