5. An Introduction to Gradle
| Author: | Nick Efford |
|---|---|
| Contact: | N.D.Efford@leeds.ac.uk |
| Status: | Final |
| Revised: | 2017-09-13 |
The aim of this worksheet is to introduce Gradle, an increasingly popular build tool in the Java world and beyond. It is useful but not essential to have done the Project Automation Using Ant worksheet first.
Although we focus mainly here on Gradle’s use from within IntelliJ IDEA, note that it can also be used on the command line, just like Ant.
For further information on Gradle, consult the official Getting Started documentation, the Vogella tutorial or the full User Guide.
Warning
Like many modern development tools, Gradle requires significant amounts of disk space. You will almost certainly have insufficient free space in your SoC filestore to run it successfully. Also, there are currently some issues with how IntelliJ handles Gradle projects on SoC Linux machines.
For these reasons, we recommend that you do this worksheet on your own PC.
If you feel compelled to use SoC Linux PCs instead, then download the
shell script soc-gradle and run it from the command line
like so:
bash soc-gradle
This should help you to avoid disk quota problems.
Note: to guarantee that everything is set up correctly, you’ll need to make sure that you run this script on every occasion that you use Gradle, before you actually use it. (This applies to both command line use and use from within IntelliJ.)
5.1. Creating a Gradle-Based Project
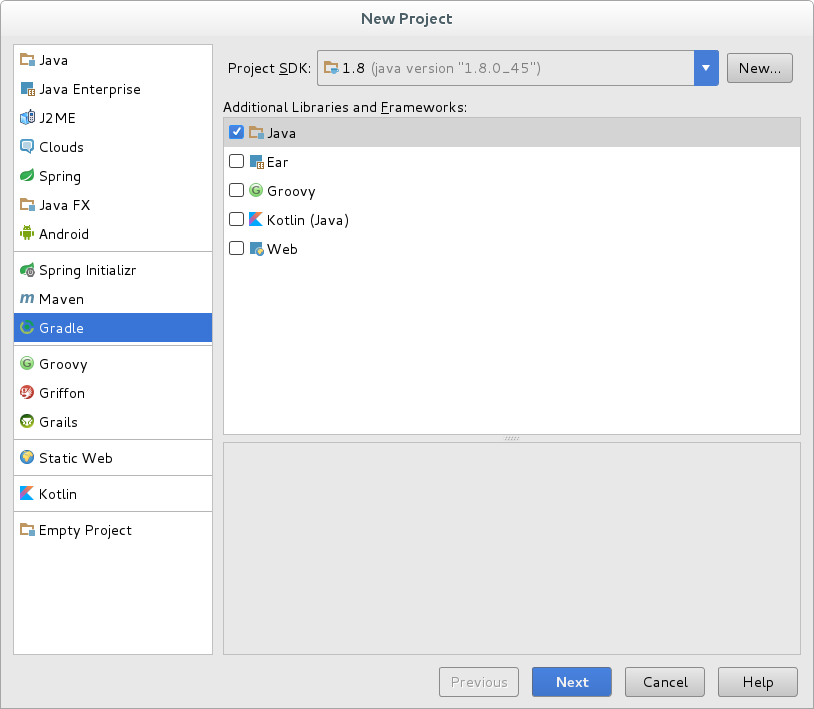
Start IntelliJ and create a new project. This time, select ‘Gradle’ from the list of project types on the left of the New Project dialog. Tick the ‘Java’ checkbox if necessary and then click Next.
The next page of the dialog will ask you to specify ‘GroupId’ and ‘ArtifactId’. These two concepts come from another very popular build & dependency management tool used in the Java world, Maven. GroupId is supposed to be a unique identifier for the organisation that created the project, whereas ArtifactId is supposed to be the unique basename of the ‘primary artifact’ being generated by a project.
Use
comp2931as the value for GroupId andclocksas the value for ArtifactId. Specify the version as1.0, then click Next. On the next page of the dialog, select the option to ‘Use auto-import’, deselect the option to ‘Create separate module per source set’, leave the other settings as-is and click Next again.On the final page of the dialog, notice that the value given for ArtifactId has been used as the project name. Leave this as-is, modify the path in the ‘Project location’ field if necessary (note the warning below), then click Finish to create the project.
Warning
If you are doing this worksheet on a SoC Linux machine, you will run into problems if the project is stored on a network filesystem, due to bugs in how IntelliJ currently supports Gradle. This means that you should not store the project under your home directory.
Instead, you should specify a path to the project like this:
/var/tmp/USERNAME/clocks
(substituting your username for
USERNAMEin the above, obviously)Note that this makes your project temporary and local to the machine you are currently using, so if you want to keep it after doing this worksheet then make sure that you copy the entire project directory into your filestore once you have finished.
This is clearly far from ideal - which is why we recommended above that you do this on your own PC!
You’ll need to wait a little while after the normal UI appears, for project creation to finish. Eventually, if you expand the directory hierarchy in the Project tool window, you should see something like this:

Notice that IntelliJ has created a
srcdirectory, with subdirectories calledmain(for the classes you are developing) andtest(for the unit tests of those classes). The other key feature isbuild.gradle, the Gradle buildfile for the project.The
gradledirectory and the scriptsgradlewandgradlew.batrepresent the Gradle Wrapper. The scripts can be used outside of IntelliJ to build the project. They will download the required version of Gradle if the user doesn’t have it installed already.Note
The Gradle Wrapper should be put into version control along with project source code and other important assets. This ensures that developers who clone your repository will be able to build the project easily.
Edit
build.gradle. Remove the line containing thesourceCompatibilitysetting (as it may cause warnings) and change thedependencieselement if necessary, so that it specifies version 4.12 of JUnit. You should end up with this:group 'comp2931' version '1.0' apply plugin: 'java' repositories { mavenCentral() } dependencies { testCompile 'junit:junit:4.12' }
This is a fairly typical buildfile. It declares that the project to be built is a standard Java project and that compiling the tests for the project will require an external library: JUnit 4.12. It further declares that this library should be downloaded from the Maven Central Repository if necessary.
Now let’s add some classes. Right-click on the
src/main/javadirectory in the Project tool window and choose . Specifycomp2931.timeas the package name. Do the same thing for thesrc/test/javadirectory.Next, download
Gradle.zipand unpack it somewhere, outside of theJUnitproject. This should give you four.javafiles. Copy the filesTime.java,Clock.javaandAlarmClock.javainto thesrc/main/java/comp2931/timedirectory of the project.Finall, copy
TimeTest.javaintosrc/test/java/comp2931/time.
5.2. Running a Gradle Build
The Gradle tool window can be used to view and execute Gradle tasks. You can also do this from the terminal window using the Gradle Wrapper scripts.
In IntelliJ, activate the Gradle tool window by clicking on its tab. This can normally be found on the right-hand edge of the UI.
Expand the Tasks hierarchy so that you can see the items listed under the ‘build’, ‘documentation’, ‘other’ and ‘verification’ headings.

A key point to note here is that these tasks were created automatically for you. You didn’t have to declare them explicitly, as is the case with targets in an Ant buildfile.
In the Gradle tool window, right-click on the
buildtask and choose the first option, . You should see detailed information on build progress appear in the Run tool window.Take a look at the items listed under ‘Run tasks’. These are all the dependent tasks that run as a result of triggering the
buildtask. Notice that the tests are compiled and run as part of the build process. Notice also that there is ajartask. Gradle assumes that the compiled classes of a Java project should be bundled as a JAR file.Run the
buildtask again. This time, you should see that virtually all of the dependent tasks have ‘UP-TO-DATE’ next to them, indicating that nothing needed to be done.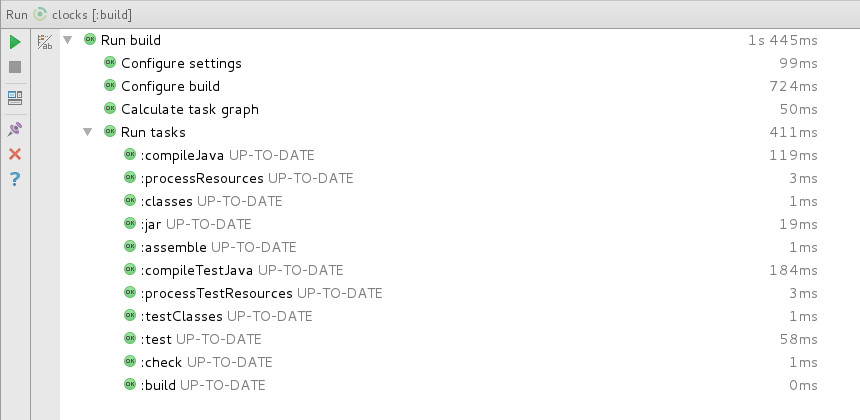
Look at the Project tool window. You should see a new directory,
build, containing various subdirectories:
The
classesdirectory is where compiler output is stored. Thelibdirectory holds the primary artifact: the JAR file containing all of the project’s classes (apart from the unit tests). Thereportdirectory contains a simple web site reporting on the results of unit testing.Try viewing the test results now. Right-click on
index.htmland choose . Drill down to the page forTimeTestand you should see this: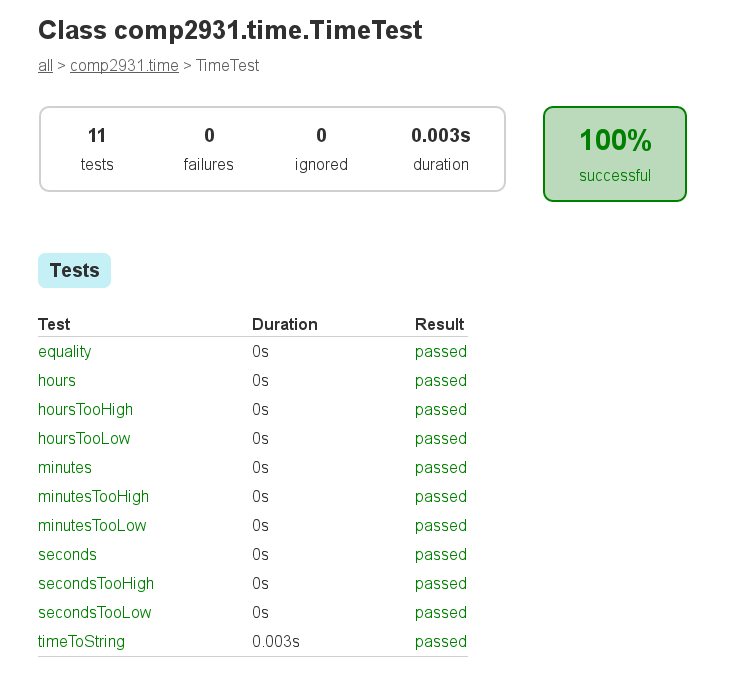
Now run the
cleantask from within IntelliJ. You should see thebuilddirectory disappear from the Project tool window.The Gradle Wrapper allows you to run Gradle tasks from the command line if you prefer, rather than doing everything in the IDE.
Open a terminal window and cd into the ‘clocks’ project directory. Then try listing all of the available tasks with
./gradlew tasks --all
Then try running the
buildtask, like so:./gradlew build
5.3. Build Customisation
In the terminal window, cd into
build/libsand examine the contents of the JAR file withjar -tf clocks-1.0.jar
Notice the absence of
TimeTest; we don’t want to bundle unit testing code with the distributable version of the application.Now try running the application:
java -cp clocks-1.0.jar comp2931.time.AlarmClock +10
This is rather clumsy. What about the
java -jarcommand instead? Try this now:java -jar clocks-1.0.jar +10
This won’t work because, by default, Gradle’s Java plugin assumes that you are developing a library for use in other applications, rather than an executable application itself.
To fix this, you need to make a small change to the build process. Edit
build.gradleand modify it so that it looks like this (new lines are highlighted):group 'comp2931' version '1.0' apply plugin: 'java' apply plugin: 'application' applicationName = 'alarmclock' mainClassName = 'comp2931.time.AlarmClock' run.args = ['+10'] repositories { mavenCentral() } dependencies { testCompile 'junit:junit:4.12' }
The
applicationplugin introduces some new tasks and properties that are useful in building executable applications. ThemainClassNameproperty allows you to specify the entry point for the application - theAlarmClockclass, in this case. You can also specify command line arguments to be used by theruntask. (These are used only by theruntask and not by the packaged application.)You should be able to see new ‘application’ and ‘distribution’ sections appear in the list of tasks in the Gradle tool window. (If you don’t see them, click on the ‘Refresh’ button in the top-left corner.) If you expand these sections, you will see that there are tasks to run the application and generate tar and Zip archives for distribution.
Try executing the
runtask, in IntelliJ. This should run the alarm clock application, with the alarm set for 10 seconds in the future.Then try executing
runin the terminal window, using the Gradle Wrapper.Try executing the
buildtask in the terminal window, then cd into thebuilddirectory and list its contents. Notice that there are two new subdirectories:distributionsandscripts.Now cd into
distributionsand enterls. You should see tar and Zip archives listed. If you unpack one of these archives (it doesn’t matter which), you will see that it bundles the library of classes (clocks-1.0.jar, in thelibsubdirectory) with a Unix shell script and Windows batch file capable of running the alarm clock application (in thebinsubdirectory).Try running one of those scripts now - e.g., by moving into the
binsubdirectory and doing./alarmclock +10
Note
The endpoint reached here is quite similar to that reached in the Project Automation Using Ant worksheet, but notice how much shorter and simpler the Gradle buildfile is compared with Ant’s!
This is a good illustration of why Gradle is rapidly gaining traction as the build tool of choice for Java projects.