6. Using Git in an IDE
| Author: | Nick Efford |
|---|---|
| Contact: | N.D.Efford@leeds.ac.uk |
| Status: | Final |
| Revised: | 2017-09-13 |
The aim of this brief worksheet is to introduce you to the support that IntelliJ IDEA offers for version control using Git.
For more information, please see the relevant section of the online user manual or Chapter 9 of IntelliJ IDEA Essentials.
6.1. Putting a Project Under Version Control
Start IntelliJ and create a new Java project called
vctest. Then create a class calledHello, containing a simple “Hello World” program:public class Hello { public static void main(String[] args) { System.out.println("Hello World!"); } }
Before going any further, you need to set up a
.gitignorefile, to tell Git which files and directories should not be put under version control. Put this in thevctestdirectory.Note
The output directory for builds (
outby default, orbuildin a Gradle-managed project) should definitely be included in.gitignore, but opinions vary on what else should be included. We suggest two options.Option 1
If you are working alone and wish to preserve project configuration details, or if you are working with others who are also using IntelliJ and are happy to adopt the same project configuration as you, then download a file for IntelliJ from https://gitignore.io and copy it into the top-level directory of your project.
Option 2
If don’t wish to preserve project configuration, or if you are sharing your work with others who won’t be used IntelliJ, then you need to make sure that all IntelliJ-related files are excluded. Create a
.gitignorefile in the top-level directory containing the following:.idea/ out/ *.iml
(If this is a Gradle-based project, add
.gradle/and replaceout/withbuild/.)Choose from the menus at the top of the window. Select Git as the version control system on the resulting dialog and click OK.
IntelliJ will create a Git repository in your project directory, and the Version Control tool window will become available. Activate it now by clicking on the tab or pressing
Alt+9. Depending on your.gitignore, you should see two or more unversioned files listed in the Version Control tool window, highlighted in red [1]. The same highlighting is used when listing the files in the Project tool window.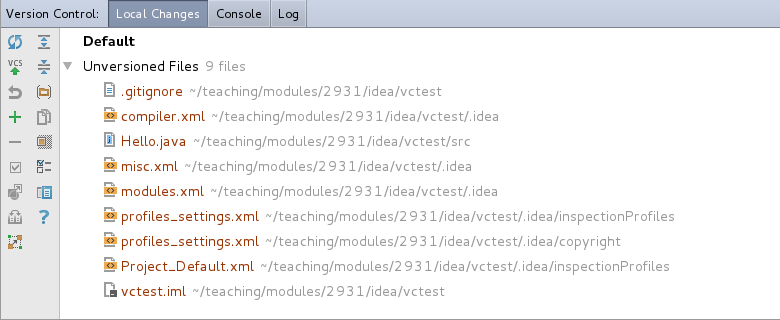
6.2. Performing Version Control Operations
You can perform a
git addoperation on individual files by right-clicking on them and choosing or by selecting them and pressingCtrl+Alt+A.To add multiple files, you can Shift- or Ctrl-click to select the ones you want in the Version Control tool window and then either right-click and choose or simply press
Ctrl+Alt+A. If you want to add everything, it is easier just to right-click on the project directory and use the same menu option or keyboard shortcut.Do this now for your project. You should find that the files are now highlighted in green - signifying that additions have been staged but not yet committed.
You can commit the changes in various ways. For example, you can right-click on the project folder and choose ; alternatively, you do this in the Version Control tool window, by right-clicking on the ‘Default’ heading in the Local Changes panel and choosing the option, or by selecting ‘Default’ and then clicking on the Commit Changes button (the one with ‘VCS’ and a green arrow pointing upwards) in the vertical toolbar at the left.
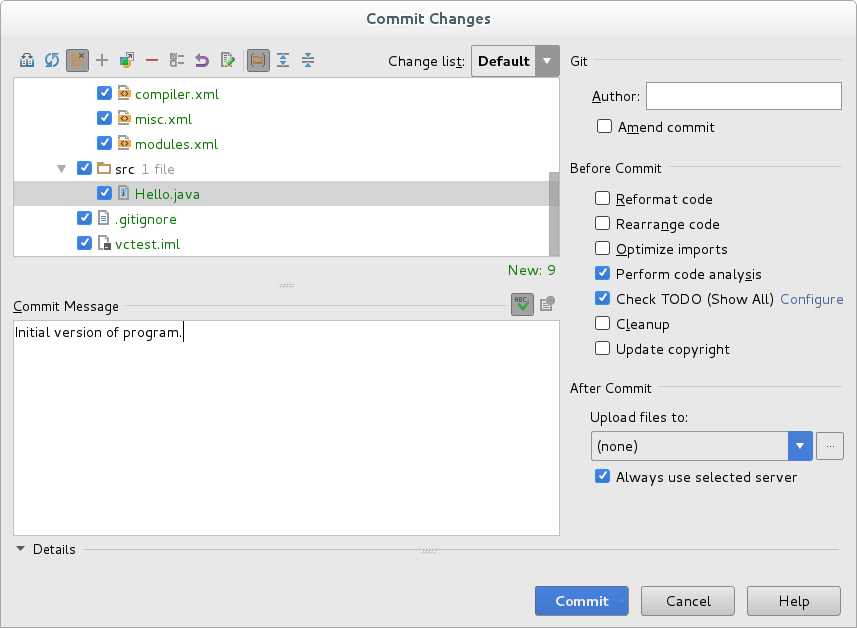
Use one of these methods now. The Commit Changes dialog will appear, allowing you to review in detail all the changes that will be committed. Notice the options under ‘Before Commit’ on the right. IntelliJ can reformat code to match the coding style defined for the project and perform various clean-up operations before committing, if you want it to.
Note
Be careful here! The Commit Changes dialog shows you details of all additions or modifications, not just the ones selected to commit.
If you see ‘New: 1 of 9’ on the dialog, this is telling you that only one out of nine newly-added files has been selected for the commit. If you want to commit all nine additions, make sure that the dialog says ‘New: 9’ rather than ‘New: 1 of 9’.
Enter “Initial version of program” as the commit message and then click the Commit button at the bottom-right of the dialog to finalize the commit. After a brief delay, you should see all of the changes disappear from the Local Changes section of the Version Control tool window.
Now make a change to
Hello.java. Change the printed message from “Hello World!” to “Hi there!”. Notice thatHello.javareappears in the Local Changes panel of the Version Control window. Notice also that the file is coloured blue, both there and in the Project tool window. This is how IntelliJ highlights changed files (as opposed to untracked files, which are coloured red).To view precisely what has changed, click the Preview Diff button in the Version Control tool window. You’ll find this near the bottom of the second column of buttons on the left, just above the Help button. Click the button again to hide the diff.
Now let’s try a different way of accessing version control operations. Choose from the main menu and a pop-up menu of useful operations will appear. Notice the options to commit all changes or commit just the currently-selected file.
Use the pop-up menu or the
Ctrl+Kshortcut to commit the change that you’ve made toHello.java. When the Commit Changes dialog appears, expand the section at the bottom so that you can see the diff for the changed file. Then enter “Changed greeting” as the commit message and click Commit.
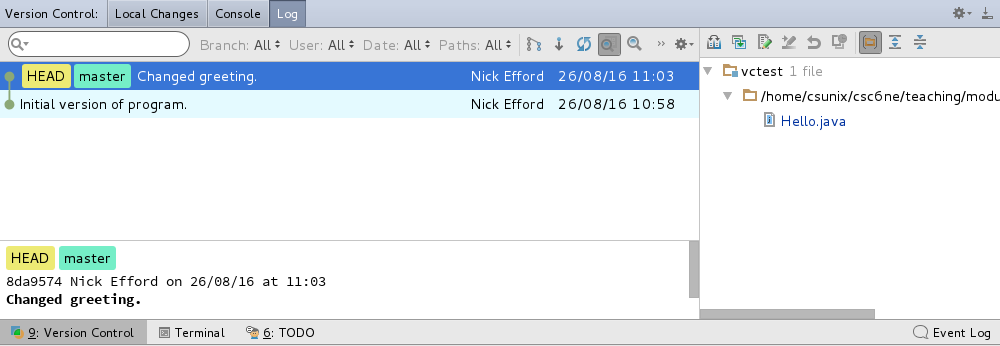
Finally, click on the Log tab of the Version Control tool window. You should see the two commits listed. You can click on a commit to see further details. The changed files are listed on the right and you can use the buttons above the list of files to interact with the list - e.g., to view the diff for the selected file in a separate window.
Note
IntelliJ does not prevent you from performing version control operations via the command line instead of the UI. A convenient place to do this is the Terminal tool window, which you can access by clicking the Terminal tab at the bottom of the UI.
You are free to use the UI, the command line or a mixture of the two, as you prefer.
6.3. Working With Remote Repositories
Use a web browser to log in to your GitLab account and create a new project called
vctest.Return to your
vctestIntelliJ project and choose . On the resulting Push Commits dialog, click the ‘Define remote’ link and specify the SSH or HTTPS address for thevctestGitLab project [2], then click OK.Back on the Push Commit dialog, click the Push button. Authenticate with your SSH passphrase or GitLab account credentials (as appropriate) if prompted. IntelliJ will notify you whether the push succeeded or not.
If the push succeeded, return to gitlab.com in your web browser and refresh the page for the
vctestproject. The two commits that you made earlier should now be visible.Make another change to
Hello.java, then bring up the Commit Changes dialog. Write an appropriate commit message, then hover the cursor over the Commit button at the bottom-right. Notice that you now have two options: commit locally, or commit and then push. Try using the latter.
Note
If you don’t already have an IntelliJ project set up, you can create the project directly from the empty remote repository.
Simply choose Check out from Version Control on the IntelliJ welcome screen, then choose ‘Git’ from the list of options. On the resulting Clone Repository dialog, specify the SSH or HTTPS URL of your GitLab project and then click Clone, authenticating with GitLab if prompted.
If the clone was successful, IntelliJ will ask if you want to create an IntelliJ project structure from the cloned repository. Click Yes and then step through the pages of the Import Project dialog, accepting the default settings on each. Click Finish to finalize the project.
Note: this won’t create a src directory in the project;
you will need to create that manually and mark it as the Sources Root.
| [1] | If you chose Option 2, only .gitignore and
Hello.java will be listed. |
| [2] | Remote repository addresses can be copied from your GitLab project’s home page. Using the SSH-based address is best and will work if you followed our advice and set up an SSH key pair on your GitLab account last year. |