1. Developing With a Java IDE
| Author: | Nick Efford |
|---|---|
| Contact: | N.D.Efford@leeds.ac.uk |
| Status: | Draft |
| Revised: | 2017-09-20 |
Java software can certainly be written using an ordinary programmer’s text editor, but Java is a fairly complex, verbose language. Integrated Development Environments (IDEs) have a variety of features that help you deal with this complexity and speed up development.
This worksheet provides a basic introduction to IntelliJ IDEA, a widely-used Java IDE, hereafter referred to simply as IntelliJ.
IntelliJ is available on SoC Linux PCs. You can obtain it for your own PC from
You can use either the Community Edition or Ultimate Edition on your PC, for free. If you opt for the latter you will need a student licence, which you can obtain simply by completing an application form. Note that this licence will allow you to use other JetBrains tools to work with C/C++, Python, databases, etc.
For more information on using IntelliJ, please see the online user manual, which is also available to download as a PDF (70 MB).
Note
Keyboard shortcuts given in this worksheet are for Linux & Windows. You can find out the equivalent shortcuts for macOS by consulting the aforementioned user manual.
Also, be aware that screenshots and some of the other details given below may not exactly match the version of IntelliJ that you are actually using.
1.1. Running IntelliJ on SoC Linux PCs
To enable use of IntelliJ on SoC machines, open a terminal window and enter the command
module add idea/2017.1.4
Note
To avoid having to do this every session, you can add this command to the end of the file
.bashrcin your home directory. Be sure not to delete any existing contents of the file when doing so!Enter
ideain the terminal window to run IntelliJ. Leave that terminal window alone until you have quit IntelliJ. You can usually ignore it but may need to refer to it if there is an error running the application.On first execution only, you may see various prompts appear. Ignore any prompts to create a Desktop entry or create a launcher script.
If you are prompted to specify active plugins, note that you can improve the performance of IntelliJ a bit by disabling ones that you don’t need. For example, you do not need the ClearCase, CVS, TFS or Perforce plugins from the Version Control section and can safely disable them.
1.2. Configuring IntelliJ
It is important to spend some time configuring a development environment so that it works the way you want it to. Follow the steps below to see how some aspects of IntelliJ’s behaviour can be configured. Revisit configuration from time to time as you gain more experience with using IntelliJ, to fine-tune the behaviour to your liking.
From the start screen, click on Configure at the lower right and choose the first option. This will be displayed as either Preferences or Settings, depending on the underlying OS.
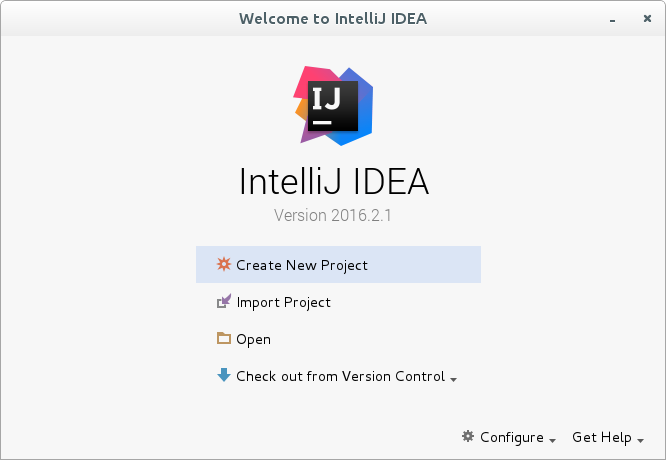
IntelliJ start screen, before any projects have been created
Open up the Appearance & Behaviour section of the menu on the left of the Preferences dialog and click on Appearance. Choose your preferred theme. IntelliJ offers a light theme as the default, but you can also choose a dark theme called ‘Darcula’ if you prefer.
Scroll down to the ‘Window Options’ section and tick the checkboxes for ‘Show tool window bars’ and ‘Show tool window numbers’. Click on the Apply button at the bottom right of the dialog to apply these changes. (Note: we assume that you’ll do the same to apply changes after each of the configuration steps outlined below.)
Navigate to in the Preferences list. Tick the checkbox for ‘Show line numbers’.
Navigate to . Click the Save As… button to save the default editor scheme as a new scheme with a different name. This will allow you to customise it.
Now look at Font subsection of Preferences and alter the font family or size if you wish, to suit your personal preferences. Do the same for the Console Font subsection. (The Console Font is what IntelliJ uses to display program output that would normally appear in a terminal window.)
Note
You may want to return here to tweak the settings once you’ve tried editing some code.
Navigate to . This specifies preferences for how IntelliJ inspects and and advises on the quality of your code. For now, we want to reconfigure just one of these inspections.
Set Profile to ‘Global Level Default’ using the drop-down box, then expand from the hierarchical list of inspections and untick the checkbox for the ‘Declaration access can be weaker’ inspection. This will stop IntelliJ from issuing unnecessary warnings about public class and method definitions.
Now navigate to . Click on the Manage… button, then click on Save As… to save the default code style as a new style with a different name. This will allow you to customise it.
Under ‘Default Options’, set the Right margin to 80 columns. This will put a vertical line in the editing window as a visual reminder of acceptable line length. You’ll lose marks for coding style in coursework if lines of code frequently exceed this limit to any significant degree. (Occasionally exceeding the limit by a small amount is acceptable.)
Finally, navigate to . Spend some time exploring the various settings. You should be able to see their effect in the sample code displayed in the dialog.
Please make sure that you
leave the ‘Use tab character’ option unchecked;use values in the range 2-4 for ‘Tab size’ and ‘Indent’;use settings that leave 1 or 2 blank lines between methods of a class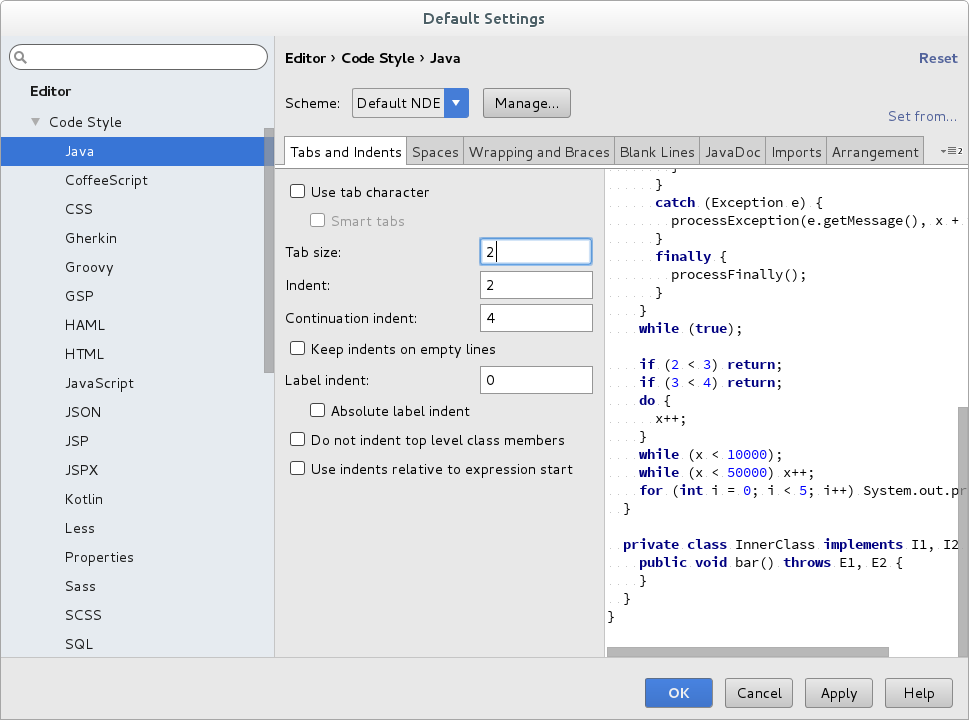
IntelliJ’s code style settings for Java
Click on the OK button at the bottom right to apply any remaining changes and dismiss the dialog.
1.3. Creating a Java Project
The start screen presents you with four options. Click the first of these, Create New Project. You’ll see a rather complex-looking ‘New Project’ dialog appear. You don’t need to worry about any of these special options for now - just make sure that you’ve provided a setting for ‘Project SDK’. This is where you specify which version of the JDK you’ll be using for the project.
If this is the first time you’ve run IntelliJ, or if you have installed another version of the JDK, you’ll need to click on New… and use the resulting dialog to tell IntelliJ where it can find the JDK. Once you’ve done this, available versions can be selected in future from the drop-down box.
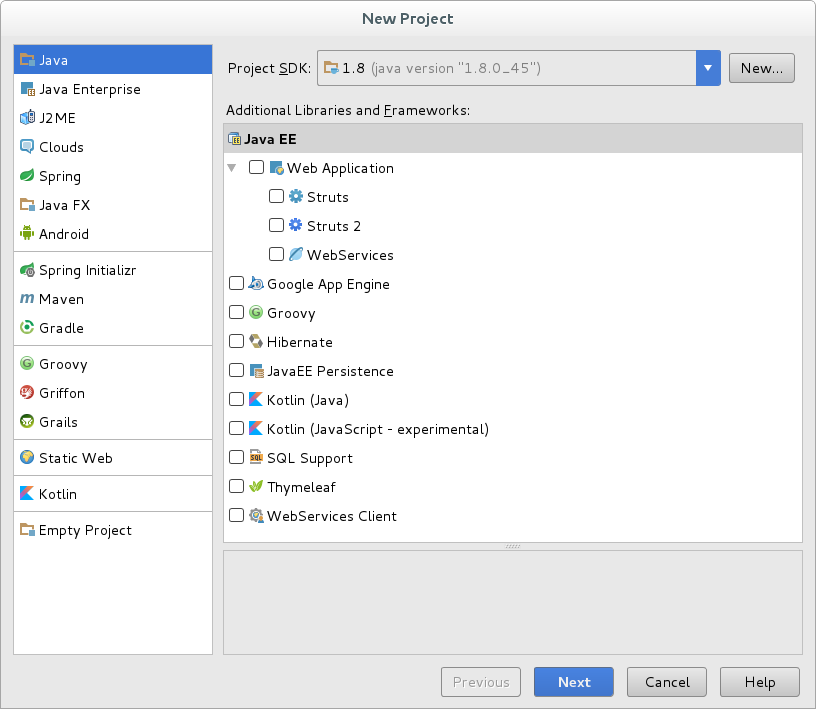
IntelliJ’s confusing New Project dialog
After setting Project SDK correctly, click Next. This takes you to the second screen of the dialog, where you have the option of basing the project on a template. You’ll probably want to ignore this option in future, but for now just tick the ‘Create project from template’ checkbox, select the second template (‘Java Hello World’) and click Next.
The final step involves giving a name and location for your project. By default, IntelliJ chooses to collect all your projects into a single directory, but you are not required to do this. You can put projects wherever you like.
For now, choose ‘Hello’ as the project name, adjust the project location to your liking and then click Finish. You should end up with a user interface similar to the example below.
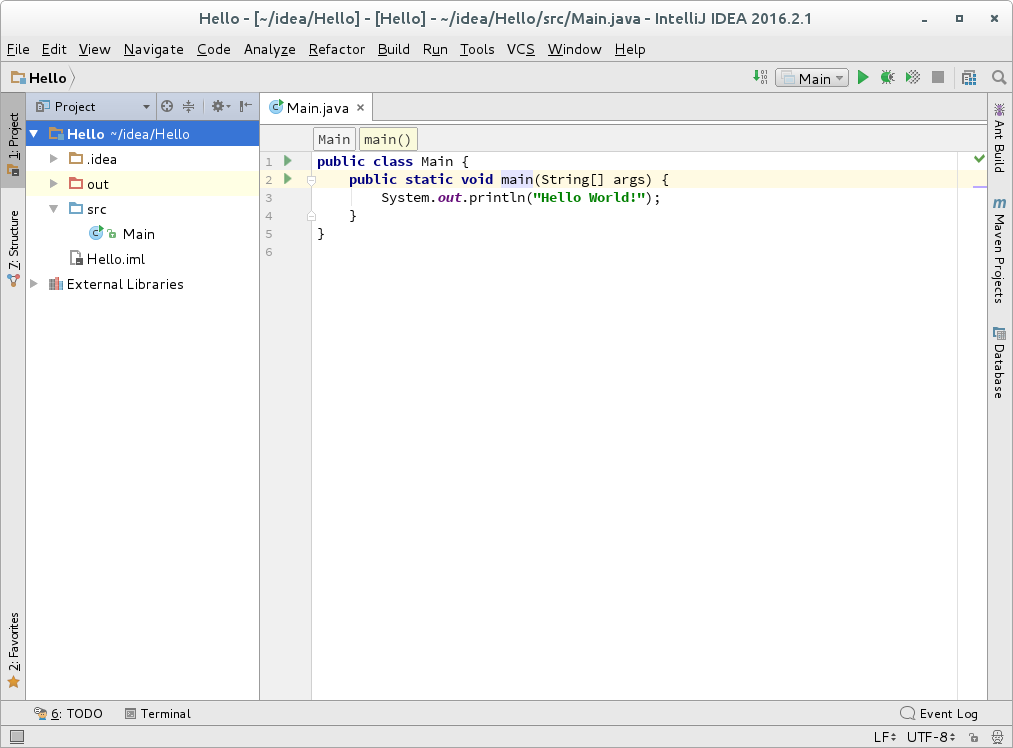
User interface for a newly-created IntelliJ project
The basic layout has a large code editing area on the right, with an area to the left of it that can display information on project and code structure. Notice the tabs (‘Project’, ‘Structure’, ‘Terminal’, ‘Ant Build’, etc) that appear around the edges of these two areas. These activate various tool windows, some of which are discussed below.
If you don’t like seeing these tool window tabs, you can hide them by clicking on the small button in the extreme lower-left corner of the UI. Hovering the mouse pointer over that button will pop up a small menu, from which you can activate the tool window; alternatively, you can activate them via keyboard shortcuts (e.g.
Alt+7to activate the Structure tool).Examine the Project tool window more closely. This shows a hierarchical folder structure containing project files. You can switch between different views of the project structure using the drop-down box at the top of the Project window, but the default view is probably the most useful.
Expand the
.idea,outandsrcfolders. The.ideafolder is where IntelliJ stores most of the configuration for the project. Thesrcfolder is where all.javafiles should be stored. Theoutfolder is where.classfiles generated by the compiler are stored.
1.4. Running Java Programs
Examine the toolbar at the top-right of the user interface. Focus on the three buttons shown below.
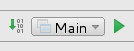
The button on the left can be used to (re)compile your code, without running it. The middle button shows you the currently active run configuration (‘Main’, in this case) and allows you to interact with it. The button on the right can be used to execute whatever has been specified by the active run configuration. Note that the functions of these buttons can also be performed via entries in the and menus (or, in some cases, via keyboard shortcuts).
Click the middle button now and choose from the drop-down list of options. You should see a new dialog appear with details of a single run configuration. Examine this configuration. Notice how it is possible to specify command line arguments and the working directory from which the program is run. Click Cancel to dismiss the dialog.
Note
Run configurations allow you to define different ways of running a single program. They also allow you to run multiple programs existing within a single project, by giving each one its own run configuration.
Now click the run button (or, if you prefer, use the keyboard shortcut -
Shift+F10). The program should execute and a new panel should appear at the bottom of UI. This is the Run window, one of IntelliJ’s tool windows. The Run window contains the output generated by the program and includes buttons that allow you to rerun the program, print the output, clear the window, etc.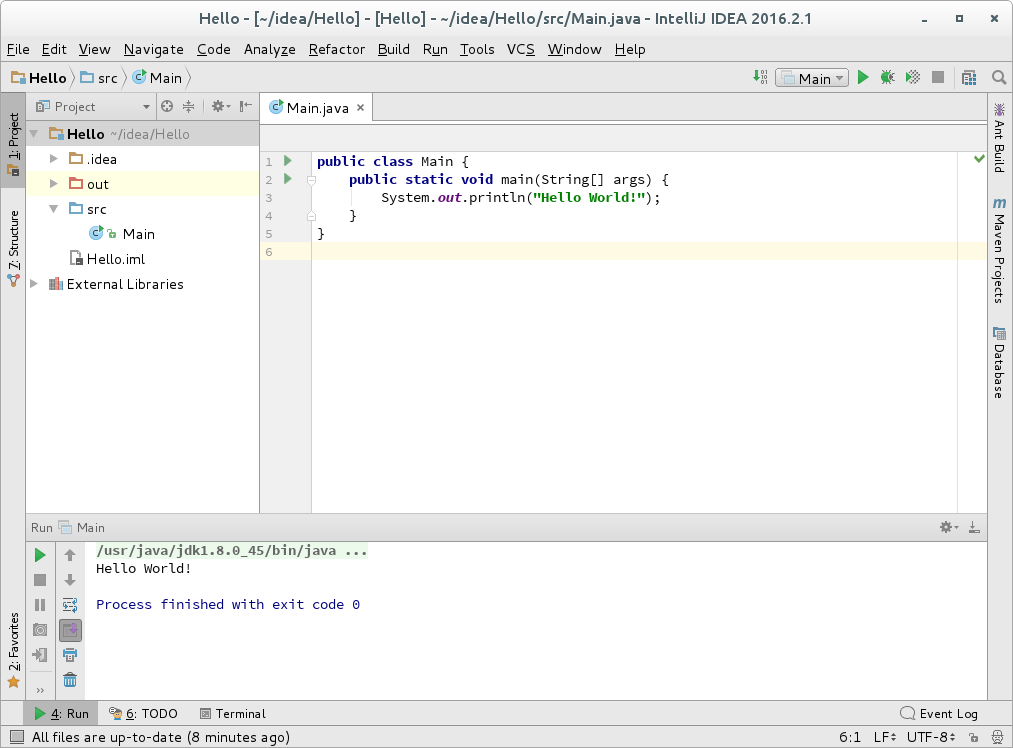
You can hide the Run window by clicking on the small button in its top-right corner. You can toggle the window on and off by clicking on the relevant tool window tab, the one labelled ‘4: Run’ at the bottom of the user interface. You can also toggle it with the
Alt+4keyboard shortcut.
1.5. Editing Java Code
IntelliJ has many features that speed up and simplify the process of writing Java code.
Like other development environments, IntelliJ does code completion. To try this out, remove the
printlnstatement from themainmethod of theMainclass and retype the first three characters, one after the other (‘S’, ‘y’ and ‘s’). Notice how IntelliJ pops up a list of possible completions, narrowing it down after each character is typed. You can move up and down this list with the arrow keys if necessary, although the first in the list is frequently the one you want.To use currently selected completion press the Tab key. Do this now to turn
SysintoSystem. Press the period key and this should bring up another list of suggested completions. Type ‘o’ to bringoutto the top of the list if necessary, then Press Tab again to add this to the statement.Press the period key one more time to bring up a final list of completions. Scroll down if necessary to find
println(String x). Press Tab to accept this and the statement will be completed, leaving the cursor between the parentheses, ready for you to type the string.Note
You can also use
Ctrl+.instead of the Tab key. This does completion and then adds a period character, which ‘queues up’ the next completion for you automatically!Suggested completions will normally pop up automatically, but if the list disappears and you wish to bring it back, simply press
Ctrl+Space.IntelliJ has templates which greatly speed up the product of commonly-used blocks of code.
To try this out, remove the
printlnstatement from the program again, then typesoutand press the Tab key. This will generate the entireprintlnstatement for you in one go! In effect,soutis a shortcut for generating aSystem.out.printlnstatement. Another useful one issouf, which generates aprintfstatement.Note
Shortcuts to activate templates are integrated with the code completion system and will appear in the list of suggested completions. You can narrow the list to show only the templates by pressing
Ctrl+J.Now try the following. Remove the entire
mainmethod from the class, then position the cursor inside the class definition and typepsvm, then press the Tab key.Lo and behold, an empty
mainmethod will be generated for you, with the requiredStringarray as a parameter and the correctpublic static voidsignature! Very handy…Templates can also have ‘holes’ for you add code.
To see this in action, position the cursor inside your now empty
mainmethod and typefor. This will bring up a list offorloop templates. Selectforifrom this list and press Tab.
A skeletal
forloop will be generated and the cursor will be positioned on the loop control variable, allowing you to change its name from the default simply by typing a new name. Typenand the loop code will be updated accordingly. Press Tab and the cursor will move forward to the point when you can type in the limit of the loop. Type5and press Tab one more time. This positions the cursor within the loop body. Add a print statement of some kind (use thesouttemplate to do this quickly), then run the program.IntelliJ streamlines the process of class creation for you. It will also detect errors as you type and offer suggestions on how to fix them.
Right-click on the
srcfolder in the Project tool window and choose . EnterPersonas the class name and click OK. This will create aPerson.javafile, containing an emptyPersonclass definition. Change the doc comment for the class to something more descriptive.Now position the cursor inside the class and add two field definitions:
private String name;
private LocalDate dateOfBirth;
As you type the second of these, you should see
LocalDateis highlighted in red, signifying a compiler error. IntelliJ will pop up a query asking you if you meant to use theLocalDateclass from thejava.timepackage.
Press
Alt+Enteras prompted, to indicate that this was your intention. IntelliJ will add an import for the class to the top of the file, thereby removing the compiler error.Warning
This is a useful feature, but suggestions are not guaranteed to be the correct fix! Don’t accept a suggestion without first thinking about whether it makes sense in the current context.
IntelliJ can generate standard methods for you automatically.
With the cursor positioned inside the class definition, choose or press
Alt+Insert. A pop-up menu of generation options will appear. Select ‘Constructor’ from the list and pressEnter.On the resulting dialog, shift-click to select both fields of the class, then click OK. A simple two-parameter constructor will be created. This is enough to get you started, but you’ll typically need to modify this further - e.g., by adding parameter validation code.
Now try using the same approach to create getters for the fields and a
toStringmethod. IntelliJ will produce a usable version of the latter to get you started, which you can then alter to your liking.At this point, try activating the Structure tool window using the ‘7: Structure’ tab on the left side of the UI, or via the
Alt+7shortcut. This summarises the structure of the class that is currently selected in the code editor. You can click on methods and fields in the list to jump to the corresponding definitions in the code editor - very handy when editing large classes containing lots of code.
Finally, note that IntelliJ can reformat code to match the current code style settings. Test this out by deliberately messing up the format of the
Personclass definition. Try making the indentation irregular, adding and removing blank lines, moving the placement of braces, etc. Then reformat the code either using or by pressingCtrl+Alt+L.Note
There’s no excuse for submitting messy code when reformatting it is so quick and easy!
1.6. Debugging Java Programs
Integrated development environments typically combine code editing features
with the ability to do source-level debugging within the environment.
This is far superior to the traditional approach of inserting lots of
temporary println statements in the code!
Copy the file
MeanMark.javainto thesrcfolder of the project. When the file appears in the Project tool window (which might take a couple of seconds), double-click on it to edit it.Examine the code. Notice the ‘To Do’ comment, alerting you to the presence of a bug that needs fixing. IntelliJ recognises such comments and collects them in the ‘To Do’ tool window, which you can access by clicking the ‘6: TODO’ tab at the bottom of the UI or by pressing
Alt+6.Note
Writing ‘To Do’ comments is good reminding yourself of tasks that need to be carried out in a project. The ‘To Do’ tool window gives you a handy way of seeing them all in one place, even though they may appear in various different locations across multiple classes.
Remember that comments need to begin with
// TODOto be recognised. (You can configure this to work differently if you want.)Run the program. You could do this by creating a suitable run configuration yourself manually but there is an easier way. Find the two green triangles in the margin to the left of the code editor (lines 8 and 9). Click on one of them (it doesn’t matter which) and choose the option to ‘Run MeanMark.main()’.
A run configuration will be created and the program will execute in the Run window. You will be prompted to enter some exam marks. Enter a few positive integer values, then finish by entering a negative value. Observe closely what happens.
You may have already guessed the problem, but let’s try to diagnose it using the debugger. Start by clicking in the left margin, on line 15 (the definition of the
totalvariable). A pink circular marker should appear in the margin, indicating the presence of a breakpoint: a place where execution will be suspended, allowing you to inspect the state of the running program.Now run the debugger by choosing or by clicking on the small ‘bug’ icon on the toolbar at the top-right of the UI. Program execution will pause at the specified breakpoint and the Debug tool window will appear at the bottom of the UI. This provides information on threads, variables and their values, etc, on the Debugger tab. A separate Console tab displays program output and allows you to supply keyboard input.

Next to the Debugger and Console tabs at the top of the Debug tool window is a set of buttons:

You can hover the mouse pointer over each of these to see what they do, and to see the corresponding keyboard shortcuts. Here are the three most useful ones:
Step Over F8Executes a statement Step Into F7Executes a statement, jumping into any method calls Step Out Shift+F8Returns from a method call Take a look at the Variables panel in the Debug window. Notice how only two variables are currently defined:
args, the array of command line arguments; andinput, theScannerobject.Use Step Over twice to execute the statements on lines 15 and 16. You should see the variables
totalandnumMarksappear, both with values of 0.Switch to the Console tab, since you’ll need to use this next. Use Step Over twice more, to execute the next two statements. The program is now waiting for input, so enter a postive integer.
Use Step Over twice more, paying close attention to the code editing window. Notice how annotations appear against any of the variables that change, showing you their new values. This saves you from having to switch back to Debugger tab in order to check what is happening to the variables.
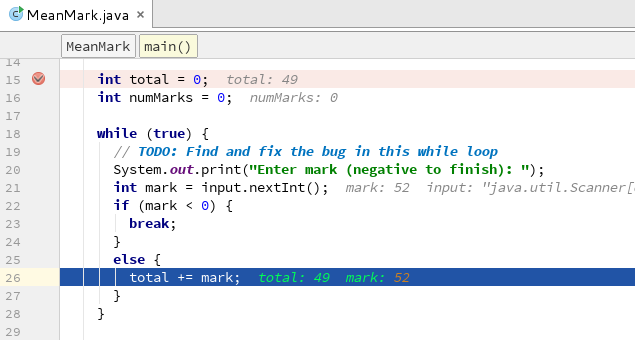
Continue using Step Over to execute the program, entering a couple more positive integer values and then ending with a negative value. Watch what happens to the variables. Can you see the problem now? (If not, focus on the values of the variables appearing in the annotation at line 32.)
Fix the problem, then rerun the program to check that it behaves correctly.
1.7. Finding Out More
For more information on what you can do with IntelliJ, please consult the online user manual or the book Intellij IDEA Essentials.